In this ultimate guide, we’ll explore how to install a WordPress theme in 2024. Whether you’re setting up your first website or looking to give your existing site a fresh look, this article will walk you through three easy methods to get a new theme up and running. By following our step-by-step instructions, you’ll be able to enhance your site’s appearance and functionality with minimal effort.
Three Methods to Install a WordPress Theme
In this guide, we’ll cover:
- Installing via the WordPress Admin Panel: This method is perfect for beginners. You’ll learn how to browse and install themes directly from your WordPress dashboard.
- Uploading a Theme: If you’ve purchased or downloaded a theme, this method will show you how to upload it manually.
- Using an FTP Client like FileZilla: Ideal for larger files or specific needs, this method involves uploading theme files directly to your server.
Why Installing a New Theme Matters
Updating or changing your WordPress theme can significantly impact your site’s performance and user experience. A well-chosen theme can:
- Improve load times
- Enhance SEO performance
- Offer better customization options
- Ensure responsive design for mobile users
By the end of this article, you’ll have the knowledge and confidence to install a WordPress theme using three straightforward methods. This will enable you to customize your site effectively, ensuring it meets your aesthetic and functional needs.
For those who are new to selecting themes, you might find our Beginner’s Guide to Choosing the Perfect WordPress Theme helpful.
While installing a new theme is essential, don’t overlook other aspects of website management:
- SEO Performance: Check out Enhancing SEO Performance: Image Optimization Tips for WordPress Websites for tips on optimizing images for better search engine rankings.
- Website Backups: Before making any changes, always back up your site. Learn more about this crucial step in The Importance of Website Backups.
Let’s dive in! Let’s explore these methods in detail so you can start customizing your WordPress site today!
Understanding WordPress Themes
WordPress themes are essentially the skin of your website. They control the visual appearance and layout, enhancing user experience and reflecting your brand’s identity. By altering a theme, you can completely transform the look and feel of your site without changing its core functionality.
Purpose:
- Visual Appeal: Themes provide a cohesive design framework, ensuring a visually appealing interface.
- Customization: They offer various customization options to tailor the site to specific needs.
- Functionality: Themes often come with built-in features that enhance site performance, such as sliders, custom widgets, and page builders.
Differences Between Free and Premium Themes
When choosing a theme, you will encounter two main categories: free WordPress themes and premium WordPress themes. Both have their unique advantages:
Free WordPress Themes:
- Cost-effective: As the name suggests, these themes are available at no cost, making them an attractive option for beginners or those on a tight budget.
- Community Support: Typically supported by the WordPress community, these themes often benefit from user-generated support forums where you can seek advice and share experiences. Additionally, many free themes receive regular updates to fix bugs and improve functionality.
- Basic Features: These usually come with essential features suitable for simple websites or blogs. While they may lack some advanced functionalities, they often include: standard layouts, basic customization options, and responsiveness for mobile devices.
Premium WordPress Themes:
- Advanced Features: Offer more advanced features like integrated SEO tools, Templates, custom plugins, and extensive theme options. This allows you to: optimize your site for search engines, add complex functionalities with ease, and utilize customizable layouts that suit your brand identity
- Professional Support: Includes dedicated customer support for troubleshooting and customization assistance. This can be invaluable if you encounter issues or need guidance on making the most of your theme’s capabilities.
- Regular Updates: Frequently updated to ensure compatibility with the latest WordPress versions and security standards. Regular updates help maintain site performance and introduce new features based on user feedback.
- Enhanced Security: Generally include enhanced security features to protect your site from vulnerabilities. Premium themes may offer: Built-in security measures, compliance with best practices for data protection, and faster response times to address any security threats.
By understanding these key differences and benefits, you can make an informed decision that aligns with your website goals and needs.
The Importance of Responsive Design in Modern Themes
Having a responsive design is crucial for any website. A responsive theme adapts seamlessly to different screen sizes and devices, ensuring an optimal viewing experience for all users.
Key Benefits:
- Improved User Experience: Visitors can easily navigate and interact with your site on any device, whether it’s a smartphone, tablet, or desktop. Features such as larger touch targets and simplified navigation menus enhance usability, making it seamless for users to find the information they need. A consistent look and feel across devices fosters familiarity, which encourages repeat visits.
- SEO Advantages: Search engines like Google prioritize mobile-friendly websites in their rankings, which means that having a responsive design is not just beneficial but essential for visibility. Mobile optimization directly influences your site’s ability to rank higher on search engine results pages (SERPs), making it easier for potential customers to discover your business. With Google’s mobile-first indexing approach, the mobile version of your site is considered the primary version, emphasizing the importance of a responsive theme.
- Higher Conversion Rates: A streamlined experience across devices can lead to higher engagement and conversion rates. This means that when visitors have an easy time navigating your site, they are more likely to complete desired actions—such as signing up for newsletters or making purchases. Responsive design reduces bounce rates, as users are less likely to leave a site that doesn’t function well on their device. Additionally, integrating clear calls-to-action (CTAs) that adapt based on screen size can further enhance conversion opportunities by guiding users effectively through their journey.
Understanding the importance of responsive design is pivotal when selecting a theme. Ensuring that your chosen theme is mobile-friendly will not only enhance user satisfaction but also improve your site’s performance in search engine rankings. For more insights on why this matters, check out The Importance of Mobile Friendly Website Design for Small Businesses.
Choosing between free and premium themes depends on your specific needs and budget. Whether you opt for a free theme or invest in a premium one, always prioritize responsive design to ensure your site remains accessible and efficient across all devices. If you’re curious about how specific themes and services can impact ROI or looking for security tips, explore our other resources:
- How Our Client Boosted Their ROI by 132% with PrettyWP’s Agency Pro Plan
- Securing Your Website: Best WordPress Security Plugins
Preparing to Install a WordPress Theme
Before diving into the installation process, preparing your WordPress site is crucial. This involves taking necessary precautions and ensuring you have all the tools and information at hand.
Importance of Backing Up Your Site
Backing up your WordPress site is a vital step before making any significant changes, including installing a new theme. A backup ensures that:
- You have a safety net: If anything goes wrong during the installation, you can easily restore your site to its previous state. This is particularly important if you’re working with a complex theme that may conflict with existing plugins or settings.
- Peace of mind: Knowing that your data is safe allows you to experiment freely without fear of losing valuable content or settings. You can focus on enhancing your site without the anxiety of potential issues.
Recommended Tools for Backup:
- UpdraftPlus: A popular plugin that allows you to schedule regular backups and store them in various locations like Dropbox, Google Drive, or even your email. It offers both manual and automatic backup options, making it flexible for different user needs.
- BackupBuddy: Another reliable plugin that provides comprehensive backup solutions, including complete site backups and easy restoration processes.
- VaultPress: Part of the Jetpack suite, this tool offers real-time backups and security scanning, ensuring your site remains protected at all times.
Hosting Provider Tools: Many hosting providers offer built-in backup solutions. For instance:
- Kinsta: Offers daily automatic backups and one-click restore options, ensuring your site can be quickly reverted to a previous state if needed.
- Cloudways: Includes automated backups and allows you to create on-demand backups whenever necessary, giving you complete control over your site’s data.
- WPEngine: Provides daily backups that are automatically stored for 30 days, along with easy restore functionalities to keep your site safe and recoverable.
Additional Considerations
Before backing up, consider these additional aspects to enhance your preparation process:
- Check Plugin Compatibility: Ensure that the plugins you are using are compatible with the new theme. Incompatibility could lead to functionality issues after installation.
- Review Current Theme Settings: Document any customizations or settings from your current theme. This will help you replicate or adapt those features once you install the new theme.
- Test on a Staging Site: If possible, set up a staging environment to test the installation of your new theme before deploying it on your live site. This minimizes risks associated with potential conflicts or errors.
Pro Tip: Regular backups should be part of your routine website maintenance. Check out our guide on WordPress Care Plans for more information on maintaining your site’s health.
By taking these preparatory steps seriously, you’ll not only safeguard your current setup but also streamline the transition to your new WordPress theme.
Finding Reputable Sources for Themes
Selecting a theme from reputable sources ensures quality and security. Here are some well-known marketplaces where you can find high-quality themes:
- WordPress.org: The official repository for free WordPress themes, featuring a wide selection that is regularly reviewed and updated.
- ThemeForest: A vast marketplace offering thousands of premium themes for various industries and niches. Features a robust filtering system, allowing you to search by category, features, or popularity, making it easier to find a theme that fits your specific needs.
- MOJO Marketplace: Known for its wide range of themes and plugins, MOJO Marketplace provides both free and premium options. Offers a user-friendly interface with detailed descriptions and customer support options to assist with your purchase.
- CSS Igniter: Offers beautifully designed themes with excellent support and regular updates. Each theme includes comprehensive documentation and video tutorials to help you set up your site smoothly.
Key Considerations When Choosing a Theme
When choosing a theme, consider the following:
- User Reviews: Reviews by other users can give you insights into the theme’s performance and reliability. Look for themes with high ratings and positive feedback regarding their ease of use and customization options.
- Developer Reputation: Themes developed by reputable developers are more likely to be well-coded and maintained. Research the developer’s history, including their track record of updates and responsiveness to user queries.
- Live Demos: Most marketplaces offer live demos so you can see how the theme looks and functions before purchasing. This allows you to explore its features in real-time, helping you make an informed decision.
Additional Tips
- Responsive Design: Ensure that the theme is mobile-friendly. A responsive design improves user experience across devices, which is crucial in today’s mobile-first world.
- SEO Optimization: Look for themes that are optimized for search engines. Features like clean code structure, fast loading times, and schema markup can help improve your site’s visibility on search engines.
- Customization Options: Consider how customizable the theme is. Some themes offer drag-and-drop builders or extensive settings panels that allow you to tailor the look and functionality of your site without coding knowledge.
Focus on these elements during your search for a WordPress theme, and you’ll be better equipped to choose one that not only meets your aesthetic preferences but also supports your site’s long-term success.
Checking for Theme Support and Updates
Support and updates are critical factors when selecting a WordPress theme. Here’s why:
- Ongoing Support: A responsive support system ensures that any issues or bugs you encounter can be resolved quickly by the theme developer. This can include troubleshooting problems, answering questions about features, or providing guidance on customization. Look for themes with a dedicated support team rather than community-based forums alone, as this often leads to faster resolutions.
- Regular Updates: Regular theme updates help keep your site secure by fixing vulnerabilities that could be exploited by hackers. These updates may also introduce new features or enhancements that improve functionality or aesthetics. Keeping your theme updated is vital for compatibility with the latest WordPress version, ensuring your site runs smoothly without conflicts.
When evaluating theme support and updating policies, look for:
- Support Forums or Help Desks: Ensure there are accessible customer support channels where you can get assistance when needed. Ideally, look for themes that offer multiple forms of support such as live chat, email, or ticket systems. Check reviews and user feedback regarding the responsiveness and effectiveness of the support provided.
- Update Frequency: Investigate how often the theme receives updates. Themes that receive regular updates (monthly or quarterly) are generally more secure and reliable compared to those with sporadic updates. Consider checking the changelog of the theme to see what types of improvements have been made over time.
Additional Considerations
- Documentation Availability: Well-documented themes make it easier for you to understand features and functionalities. Comprehensive documentation should include installation guides, FAQs, and troubleshooting tips.
- Community Engagement: A vibrant community surrounding a theme can provide additional resources such as tutorials, tips, and shared experiences that can be invaluable as you work with the theme.
To explore further about creating engaging content with WordPress using well-supported themes, check out our article on best practices. By following these preparatory steps, you’ll ensure a smooth transition to your new WordPress theme while safeguarding your site’s current state.
Method 1: Installing a Theme via the WordPress Admin Panel
Installing a WordPress theme via the WordPress dashboard is one of the easiest and most straightforward methods available. It allows you to browse, install, and activate themes directly from your admin panel without needing any technical expertise.
Step-by-Step Guide to Accessing the Appearance Section in Your WordPress Dashboard
Log into Your WordPress Dashboard:
- Enter your credentials and navigate to your site’s admin area.
- The URL typically looks like
https://domain.com/wp-admin.
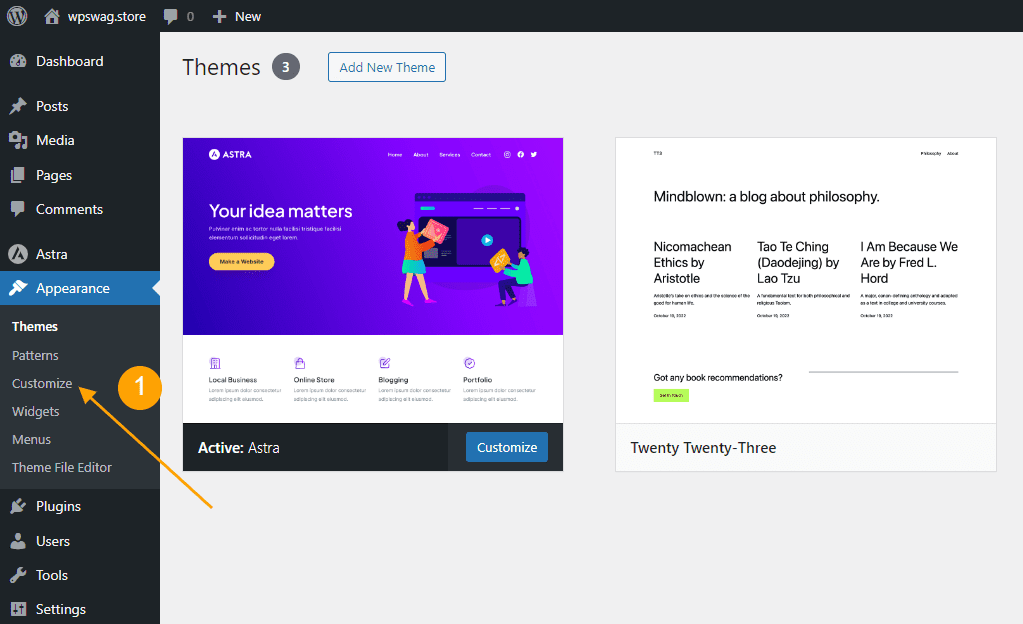
Access the Appearance Section:
- Once logged in, locate the sidebar on the left side of your dashboard.
- Click on Appearance to expand the menu options.
Navigate to Themes:
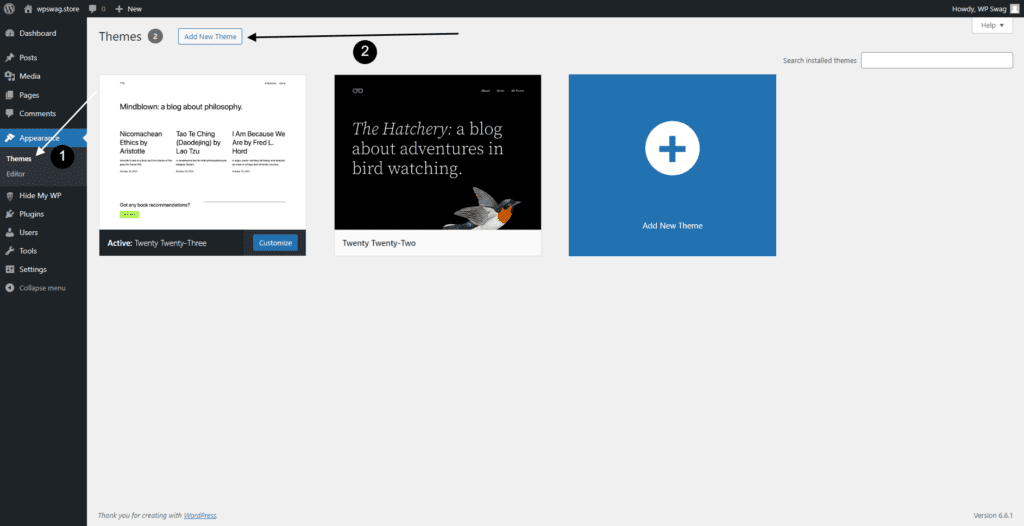
Under the Appearance menu, select Themes. This will take you to the Themes page where you can manage your existing themes or add new ones.
- Add a New Theme: On the Themes page, click on the Add New button at the top. This will open a new interface where you can search for and explore different themes.

Exploring Featured, Popular, or Latest Themes and Selecting One for Installation
Browse Themes:
You can now browse through various categories:
- Featured: Highlighted themes recommended by WordPress.
- Popular: Themes that are widely used by other WordPress users.
- Latest: Recently added themes.
Use Filters and Search Bar
- Utilize filters such as layout, features, and subject to narrow down your choices.
- Alternatively, use the search bar if you have a specific theme in mind.
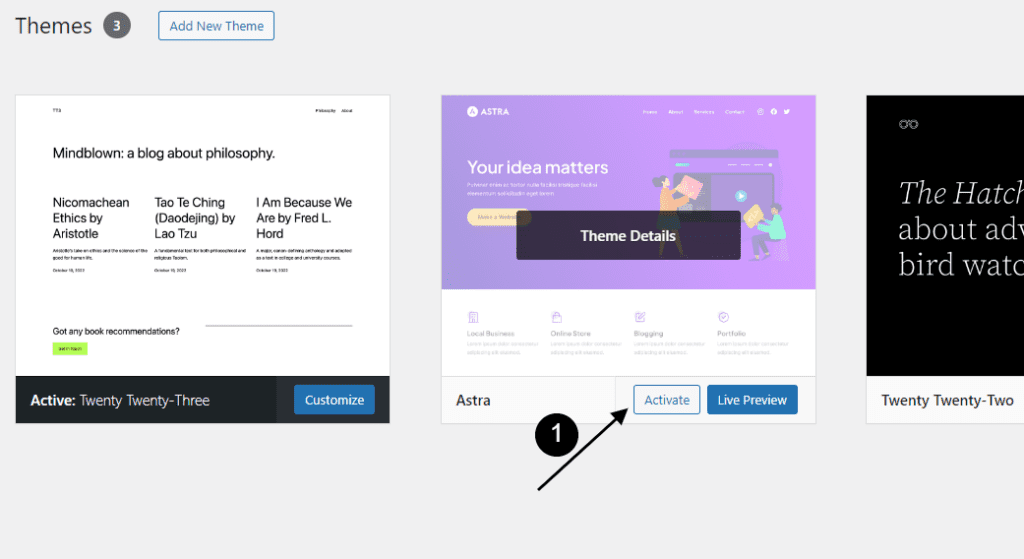
Previewing Themes
- Before installing a theme, you can click on Preview to see how it will look on your site.

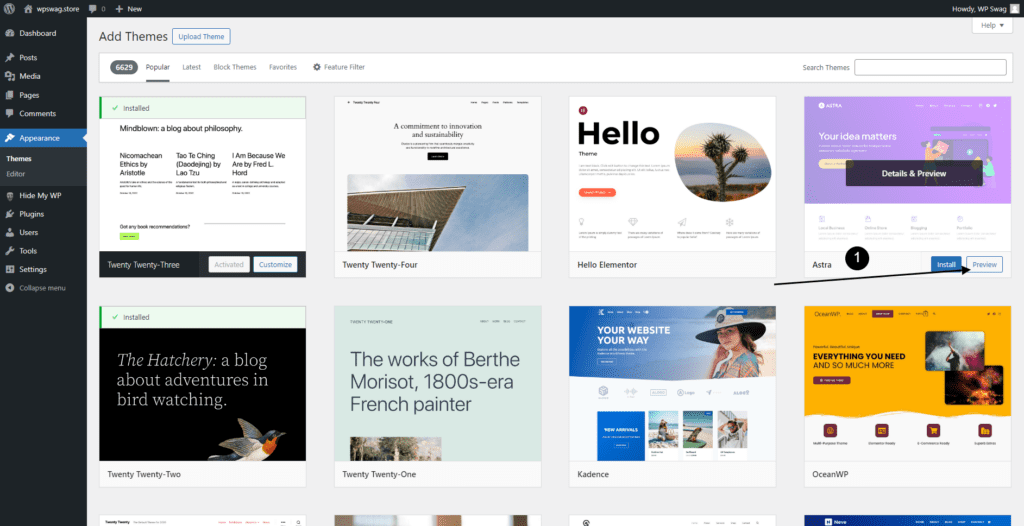
Install Your Chosen Theme
- Once you find a theme that fits your needs, click on the Install button.
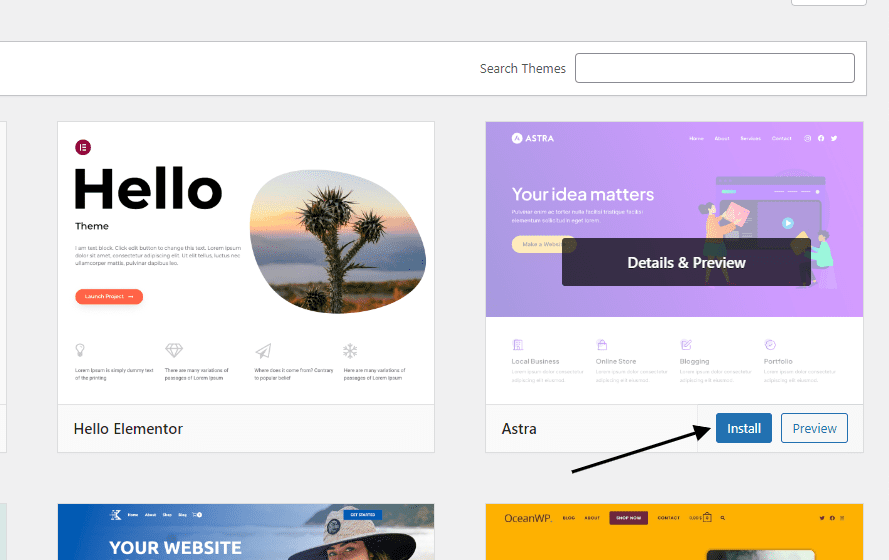
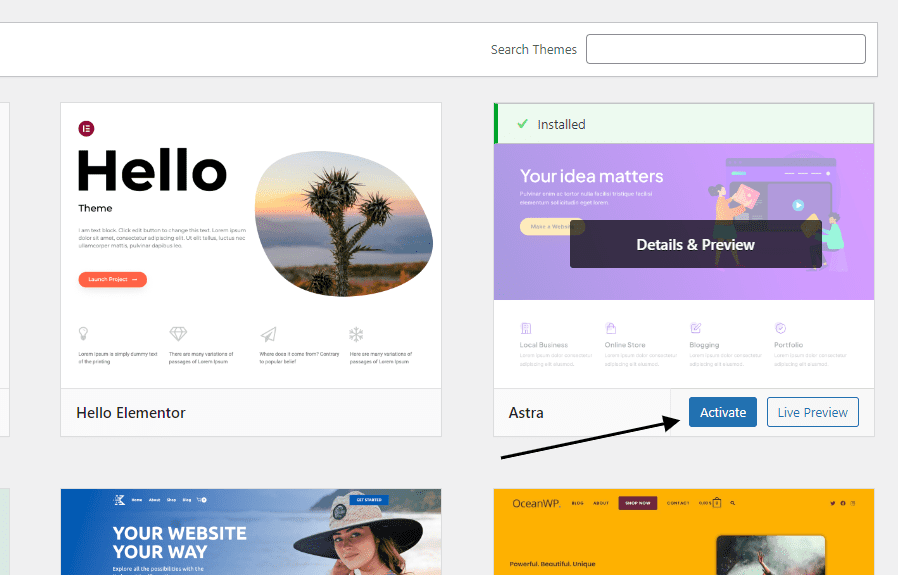
Activating the Installed Theme
Activate the Theme
- After installation is complete, an Activate button will appear.
- Click on it to make this theme live on your site.
Customize Your Theme
- Navigate back to Appearance > Customize to tailor the theme settings according to your brand’s aesthetics and functionality needs.
By following these steps, you’ll have successfully installed a new WordPress theme via the admin panel. This method ensures that you can quickly enhance both the look and functionality of your site without any hassle.
Method 2: Uploading and Installing a Theme
Downloading a .zip File from a Reputable Source
When you want to upload a WordPress theme, the first step is to download the theme’s .zip file from a trustworthy source. Reputable marketplaces like WordPress, ThemeForest, MOJO Marketplace, and CSS Igniter offer a wide range of high-quality themes. These platforms ensure that the themes are regularly updated and supported by their developers.
- Visit the marketplace: Navigate to your chosen marketplace.
- Browse or search for a theme: Use filters and categories to find a theme that suits your needs.
- Purchase or download the theme: Follow the instructions to purchase or download the theme. Make sure you’re downloading the file in .zip format, as this is necessary for uploading it to WordPress.
Step-by-Step Process for Uploading the Theme
Once you have your .zip file, follow these steps to upload and install your new theme via your WordPress dashboard.
Access Appearance > Themes:
- Log in to your WordPress admin panel.
- On the left-hand menu, hover over Appearance and click on Themes.
Add New Theme:
- At the top of the Themes page, click on the Add New button.
Upload Theme:
- Click on the Upload Theme button located at the top of the page.
- A new section will appear where you can choose the .zip file.

Choose File:
- Click on Choose File and select the .zip file of your theme from your computer.
Install Now:
- After selecting the file, click on Install Now (refer to the screenshot above). WordPress will begin unpacking and installing the theme.
Activating Your Uploaded Theme
Once installation is complete, you need to activate your new theme.
Activate:
- After installation, you’ll see two options: Live Preview and Activate.
- Click on Activate to set your newly uploaded theme as the active theme for your site.
At this stage, your new theme should be live on your site.
Additional Tips
- Always ensure that you’re downloading themes from reputable sources to avoid potential security issues. For more information on securing your eCommerce website, refer to Ensuring eCommerce Website Security.
- Regularly update both free and premium themes to benefit from improvements and security patches.
For those who prioritize security measures in their WordPress setup, it’s beneficial to review 10 Essential Security Measures for Your WordPress Website.
Method 3: Installing a Theme Using an FTP Client Like FileZilla
Why Use an FTP Client for Theme Installation?
Sometimes, the built-in WordPress theme installer might not suffice. This is particularly true for:
- Larger Files: Some themes exceed upload limits imposed by your server settings, making it impossible to install them via the WordPress dashboard.
- Specific Needs: Advanced users may prefer more control over the installation process, allowing them to customize file structures or manage dependencies effectively.
Using an FTP client like FileZilla allows you to directly upload theme files to your server, bypassing these limitations and providing a more versatile installation method.
Connecting to Your Site Using FileZilla
Before you start uploading, you’ll need to connect to your WordPress site using an FTP client. Follow these steps:
- Download and Install FileZilla: If you haven’t already, download FileZilla from FileZilla’s official website. Ensure you choose the version compatible with your operating system (Windows, macOS, or Linux).
- Get Your FTP Credentials: These are typically provided by your hosting provider. You’ll need:
Host: Usually your domain name (e.g., example.com) or an IP address.
Username: Provided by your host during setup.
Password: The password associated with your FTP account.
Port: Typically 21 for FTP or 22 for SFTP; check with your host if unsure.
- Open FileZilla and Enter Your Credentials:
- Launch FileZilla.
- In the Quickconnect bar, enter your host, username, password, and port.
- Click “Quickconnect” to establish a connection.
Uploading Files Directly into wp-content/themes Folder
Once connected, you’re ready to upload your theme files:
- Navigate to Your WordPress Directory: In the Remote site section of FileZilla, locate and navigate to
public_html/wp-content/themes. This is where all themes are stored in WordPress. - Upload the Theme: On your local machine (Local site section), find the unzipped theme folder you’ve downloaded. Drag and drop this folder into the
themesdirectory on the remote server. Ensure that you are uploading the entire folder containing all theme files and subdirectories. - Wait for Upload Completion: Monitor the transfer status at the bottom of the FileZilla window. Ensure that all files have been successfully transferred without errors.
Activating the New Theme from the Dashboard
With your theme files now on the server, you’ll need to activate it within WordPress:
- Log into Your WordPress Admin Panel: Navigate to
yourdomain.com/wp-adminand enter your credentials. - Go to Appearance > Themes: This will display a list of all installed themes on your website.
- Locate and Activate Your New Theme: Find the theme you just uploaded; click “Activate” next to it. You should see a confirmation message indicating that the activation was successful.
By following these steps, you ensure that even larger or complex themes are installed correctly without running into common issues such as file size limits or timeouts during upload.
Alternative Method: Hosting Provider Installation Options such as Siteground
When it comes to ease of use and streamlined processes, some hosting providers stand out by offering dedicated tools for installing WordPress themes. These hosting provider installation options can significantly simplify your workflow, allowing you to focus more on customizing and less on the technical intricacies.
Simplified Theme Installation Process
Many hosting providers, like SiteGround, have integrated features in their control panels that make theme installation a breeze. Here’s an overview of how these providers streamline the process:
- Integrated Theme Repositories: Some hosting services offer direct access to theme repositories within their dashboards. This means you can browse, select, and install themes without ever leaving your hosting control panel.
- One-Click Installations: The convenience of one-click installations cannot be overstated. With just a single click, the chosen theme is downloaded, installed, and activated on your WordPress site.
- Automated Updates: Keeping your themes updated is crucial for security and performance. Hosting providers often include automated updates for themes installed through their systems, ensuring you’re always running the latest version.
Benefits of Using Hosting Provider Tools
Opting for hosting provider tools provides several advantages:
- Ease of Management: Managing your site becomes much simpler when everything is centralized. From backups to theme installations, having all tools in one place saves time and reduces complexity.
- Enhanced Support: Many hosting providers offer specialized support for the tools they provide. If you encounter an issue during theme installation or customization, you can rely on their customer service for quick resolutions.
- Optimized Performance: Hosting providers often optimize their servers for WordPress performance. Themes installed through these platforms are likely to benefit from these optimizations, leading to faster load times and better overall performance.
- Security Enhancements: Security is paramount when managing a website. Hosting providers usually implement stringent security measures, protecting your site from vulnerabilities associated with outdated or poorly coded themes.
It’s important to note that installation methods can vary across different hosting providers, each offering unique features and interfaces that can further ease the process. Choosing to use hosting provider installation options is an excellent way to simplify the process of installing WordPress themes while enjoying additional benefits like enhanced support and optimized performance. For those looking to streamline their website management tasks, this method offers a compelling alternative to traditional installation methods.
For further enhancement of your WordPress experience in 2024, consider exploring our Ultimate WordPress SEO Checklist or check out our recommendations for 10 Best and Free WordPress Themes.
Post-Installation Steps After Installing Your New Theme
Customizing Your New Theme Using the WordPress Customizer
After installing your new WordPress theme, customization is key to making it uniquely yours. The WordPress Customizer is a powerful tool that allows you to tweak various aspects of your theme’s appearance and functionality in real time.
Accessing the Customizer:
- Navigate to your WordPress dashboard.
- Click on Appearance > Customize.
Customization Options:
- Site Identity: Add or change your site title, tagline, and site icon (favicon).
- Colors: Adjust your site’s color scheme to match your brand identity.
- Menus: Create and manage navigation menus for better user experience.
- Widgets: Add widgets to various widget-ready areas like sidebars and footers.
Live Preview
One of the best features of the Customizer is the live preview. As you make changes, you can see how they look on your site before publishing them.
“The Customizer offers an intuitive way to personalize your theme without touching a single line of code.”
Additional Tips for E-Commerce Sites
- Ensure your checkout process is smooth by testing it thoroughly before going live.
- Customize email templates under WooCommerce’s email settings to align with your brand.
- Use analytics tools to track customer behavior and optimize your sales strategy.
For more insights on keeping your website updated and error-free, visit our articles on common WordPress errors and solutions and why it’s needed to keep your website updated.
Embrace these post-installation steps to create a seamless user experience and elevate your site’s performance.
Troubleshooting Common Installation Issues
When installing a WordPress theme, you may encounter some common installation issues. Addressing these problems promptly ensures your website runs smoothly and looks fantastic.
Common Problems Users Face During Installation
1. Compatibility Issues
- PHP Version: Some themes require a specific PHP version to function correctly. If your hosting environment doesn’t meet these requirements, the theme may not install or work as expected.
- WordPress Version: Ensure your WordPress installation is up-to-date. Themes often rely on the latest features and security patches available in newer versions.
- Plugin Conflicts: Existing plugins might conflict with the new theme, causing errors or display issues.
2. Upload Limitations
- File Size Limits: Hosting providers often limit the size of files you can upload through the WordPress dashboard. Larger themes might exceed this limit, requiring an alternative method like FTP for installation.
3. Missing Stylesheet Error
- This error typically occurs when trying to upload an incomplete or incorrect .zip file that doesn’t contain the necessary theme files.
Solutions and Resources for Troubleshooting
1. Checking PHP Version
To check and update your PHP version:
- Log in to your hosting control panel.
- Look for the PHP Configuration option (often found under the Software or Programming tab).
- Check the current PHP version and update it if necessary.
Most modern themes require PHP 7.4 or higher for optimal performance and security.
2. Updating WordPress
Keeping WordPress updated is crucial:
- Navigate to Dashboard > Updates.
- Click “Update Now” to install the latest version.
This step ensures compatibility with new themes and plugins, enhancing site performance and security.
3. Resolving Plugin Conflicts
To identify and resolve plugin conflicts:
- Deactivate all plugins from Dashboard > Plugins.
- Activate your new theme.
- Reactivate plugins one by one, checking for issues each time.
This process helps pinpoint problematic plugins that need updates or replacements.
4. Bypassing Upload Limitations
For larger themes:
- Using FTP Client: Connect to your site using an FTP client like FileZilla. Navigate to
wp-content/themesfolder. Upload the unpacked theme folder directly into this directory. Activate the theme from Dashboard > Appearance > Themes. - Increasing Upload Limit (if comfortable with coding):
- Add or modify
php.inifile in your WordPress root directory:ini upload_max_filesize = 64M post_max_size = 64M max_execution_time = 300
- Alternatively, add this line to
.htaccessfile:apacheconf php_value upload_max_filesize 64M php_value post_max_size 64M php_value max_execution_time 300
5. Fixing Missing Stylesheet Error
Ensure you are uploading the correct .zip file containing all necessary theme files:
- Download theme files from reputable sources like ThemeForest.
- Extract and verify contents before uploading again via Dashboard > Appearance > Themes > Add New > Upload Theme.
For more insights on optimizing your new WordPress site after resolving these issues, consider exploring resources such as The Ultimate Guide to On-Page SEO for Your WordPress Website.
Final Thoughts
Changing your WordPress theme can bring a multitude of benefits to your site, particularly in 2024, as web design trends and technological advancements continue to evolve. Let’s explore some of the key advantages you can gain by updating your theme. A fresh, modern theme can significantly improve the user experience on your site. Newer themes are often designed with the latest user interface (UI) and user experience (UX) principles in mind, making navigation more intuitive and enjoyable for your visitors. This can lead to:
- Increased engagement: Users are likely to spend more time on a visually appealing and easy-to-navigate site.
- Lower bounce rates: A well-designed theme can encourage visitors to explore more pages on your site.
Modern WordPress themes are optimized for speed and performance, which is crucial for both user satisfaction and search engine rankings. Benefits include:
- Faster load times: Themes built with clean code and optimized images ensure quicker page loading.
- Better SEO: Search engines favor fast-loading websites, potentially boosting your rankings.
With mobile traffic continually on the rise, having a responsive theme is non-negotiable. Responsive themes automatically adjust to different screen sizes, providing a seamless experience across devices. This ensures:
- Accessibility: Your content is easily accessible on smartphones, tablets, and desktops.
- Higher retention: Mobile users are less likely to leave if they find your site easy to navigate.
New themes often come with advanced customization options that allow you to tailor the design to your brand without needing extensive coding knowledge. Features may include:
- Drag-and-drop builders: Easily customize layouts with intuitive tools.
- Pre-built templates: Quickly set up pages using professionally designed templates.
Security is paramount in today’s digital landscape. Modern themes are regularly updated to patch vulnerabilities and protect against threats. Benefits include:
- Reduced risk of attacks: Updates often include security enhancements that protect your site.
- Peace of mind: Knowing your theme is up-to-date alleviates concerns about potential breaches.
If you’re running an online store, switching to a theme optimized for e-commerce can dramatically improve functionality and sales. Consider themes that offer:
- WooCommerce integration: Seamlessly manage products, payments, and shipping.
- Conversion-focused designs: Layouts designed to drive sales and reduce cart abandonment.
Experimenting with different themes allows you to discover what resonates best with your audience. Whether it’s a minimalist design or a bold, colorful layout, changing your theme can refresh your site’s look and feel.
Encouraging exploration of various styles not only keeps your content visually engaging but also helps in aligning with current trends. This flexibility ensures that your website remains relevant and appealing over time.
For those looking for guidance on setting up automated backups before making such changes, Setting Up Automated Backups with UpdraftPlus offers an excellent resource.
The Keyword Research Guide might also provide useful insights as you optimize content for the new design.
By embracing these benefits of changing a WordPress theme, you set the stage for improved performance, enhanced aesthetics, and a better overall user experience in 2024.